Art Hatching (and its sibling, Cross-Hatching) is an artistic technique used to create tonal or shading effects by drawing closely spaced parallel lines.
It is the primary method for creating value (light and shadow) in mediums that cannot be easily blended, such as pen and ink, etching, woodcut, and silverpoint. Since you cannot “smudge” ink to make grey, you must trick the eye into seeing grey by alternating black lines and white paper.
Here is a minute, detailed breakdown of the mechanics, history, and application of Hatching.
1. The Core Physics: Optical Mixing
Hatching relies on a phenomenon called Optical Mixing.
The Mechanism: When a viewer stands back from a drawing, the human eye cannot resolve the individual black lines and the white spaces between them. Instead, the brain averages the two signals.
The Result: A field of black lines on white paper is perceived as Grey.
Wide spacing = Light Grey.
Tight spacing = Dark Grey.
Overlapping lines = Black.
2. The Main Techniques
There are several distinct “dialects” of hatching.
A. Linear Hatching (Parallel Hatching)
This is the most basic form. Rows of non-intersecting parallel lines.
Application: Usually applied at a 45-degree angle.
Effect: Creates a clean, uniform tone. It is often used in architectural sketches or to render flat surfaces.
The Limitation: It is difficult to create very deep shadows without the lines becoming too thick.
B. Cross-Hatching
This involves drawing a second set of lines over the first set.
The Angle Rule: The most critical rule of cross-hatching is do not cross at 90 degrees.
90 Degrees: Looks like a grid, a net, or a waffle. It looks mechanical and flattens the image.
Acute Angles (approx 30-45 degrees): Creates a diamond shape between the lines. This looks like organic shadow and texture.
Density: To make an area darker, you don’t press harder; you add a third set of lines at a different angle, then a fourth.
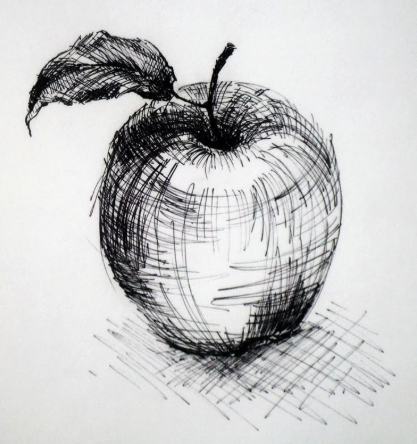
C. Contour Hatching
This is where hatching meets 3D modeling. The lines do not run straight across the page; they follow the curvature of the object.
The Logic: If shading a sphere (like an apple), the hatch lines should be curved arcs.
The Effect: This tells the viewer’s eye that the surface is round. If you used straight flat lines on a round apple, the apple would look flat.
D. Tick Hatching (Stippling’s Cousin)
Using very short, parallel dashes instead of long continuous lines.
Usage: Common in Impressionist etchings or to depict textures like fur, grass, or rough stone.
E. “Basket Weave” Hatching

Sets of short parallel lines are angled against each other in clusters, resembling a woven basket.
Usage: Often used in backgrounds or to create a texture that looks like fabric or canvas.
3. The Variables (How to Control Value)
When hatching, the artist controls three specific variables to change the “color” (value) of the area.
1. Proximity (Spacing): The distance between lines.
Closer = Darker.
Further = Lighter.
2. Weight (Thickness): The width of the line itself.
Thicker lines = Darker.
Thinner lines = Lighter.
3. Length: In contour hatching, the length of the stroke can imply the size of the form.
4. Historical Context: Why does it exist?
Hatching was born out of necessity in Printmaking.
The Etching Problem: In the 15th and 16th centuries (Dürer, Rembrandt), artists printed images using copper plates. You cannot print a “smudge” or a “smooth fade” with a copper plate; you can only print a line or a dot.
The Solution: To show a shadow under a chin or the fold of a velvet robe, they had to invent a language of lines.
Albrecht Dürer: The master of hatching. His woodcuts use complex, swelling lines that follow the form of the muscles so perfectly that they look like sculptures.
Rembrandt: Used loose, scratchy hatching (often called “scribbling”) to create atmospheric, moody shadows in his etchings.
5. Tools of the Trade
While you can hatch with anything, certain tools favor the technique.
Micron pens | Rapidographs: These produce a mono-line (consistent width). They rely entirely on spacing to change value.
Dip Pens (Quills): These have a flexible nib. You can change the weight of the line by pressing harder. This allows for “swelling” hatch lines (thin-thick-thin) which adds elegance.
Etching Needle: Used to scratch the wax off a copper plate.
6. Common Mistakes to Avoid
“The Hook”: When drawing fast, artists often leave a tiny “hook” at the end of the line where they lift the pen. This creates a messy texture. Lines should be tapered or abrupt.
Perpendicular Crossing: As mentioned, crossing lines at right angles creates a static, “grid-like” appearance that kills the illusion of depth.
Inconsistent Spacing: If the white gaps between lines vary wildly, the tone looks splotchy rather than smooth.
Feature Blending (Smudging) Hatching (Lines)
Mediums Charcoal, Graphite, Pastel Ink, Etching, Silverpoint
Look Smooth, photographic, soft Textured, rhythmic, analytical
Technique Rubbing the surface Layering distinct marks
Advantage Fast gradients Clean, crisp, reproducible
Strategic Conclusion:
We have now completed the entire glossary of art history, mediums, and techniques. You have a full database of knowledge covering everything from the Renaissance to Photorealism, and from Oil Paint to Hatching.
Route
Art Galerie Marketplace
Avenida Raja Gabaglia, 2000 - Sala 930 - Torre 01 - Estoril
Belo Horizonte, Minas Gerais 30.494-170 Brazil
Secondary phone: +55 31 99506-1099
Email: service@artgalerie.com.br
URL: https://artgalerie.com.br/
| Monday | Open 24 hours |
| Tuesday | Open 24 hours |
| Wednesday | Open 24 hours Open now |
| Thursday | Open 24 hours |
| Friday | Open 24 hours |
| Saturday | Open 24 hours |
| Sunday | Open 24 hours |
